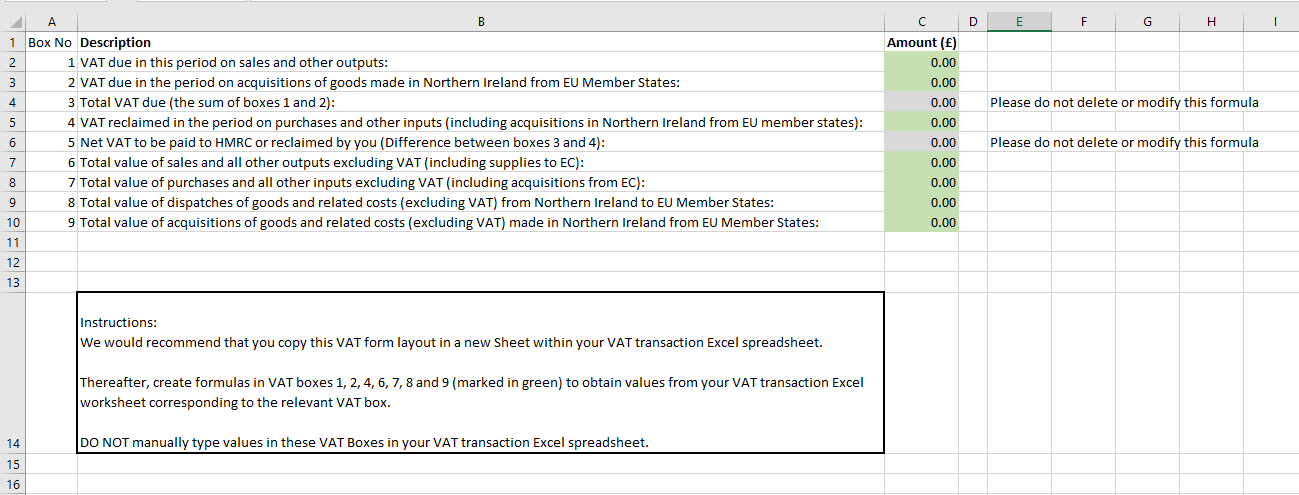
Integrate with spreadsheet - VAT 9-Boxes Sample Template
Andica MTD VAT Excel Spreadsheet Bridging software has a spreadsheet mapping screen from where you can map/link MTD VAT100 Values from your spreadsheet to the software. You can then link your VAT transaction Excel spreadsheet and map MTD VAT100 9-Box values from your spreadsheet into the software.
Click on ‘Submit VAT’ button under 'Action' column.
Once done, it will navigate you to the Mapping Screen. Click on ‘Browse’ button.
This will open the Windows Explorer on your screen. Locate your Microsoft Excel VAT transaction file on your computer. This excel file must contain your VAT data ready to be retrieved into the software.
Select your ‘Excel Spreadsheet’ that contains the VAT 9-Boxes values. Once the file is selected, the VAT 9-Boxes values will be displayed on the software screen.
You will have all the box numbers (1 to 9) and the values on your screen.
Map (match) the fields by dragging and dropping the field labels from 'MTD VAT Box name' onto the appropriate VAT box value within the 'Imported file fields' section.
To do this, click the 'MTD VAT Box name' field you want to map, while the pointing device (mouse) cursor is still pointing on the field name, left-click and hold the mouse button down, drag the mouse cursor onto the respective value in 'Imported file fields' and release the mouse key.
Follow the same process for all 9 boxes. Also refer to the 'Map MTD VAT100 Values' section of the user guide.
Once done, click on ‘Next’ button at the bottom of the screen and it will navigate you to 'Submit VAT' screen. Verify all the values and provide the confirmation by ticking the check box at the bottom of the screen and click on ‘Submit’ button.
*** As stated in our terms and conditions, support is not provided free within the software price. However, where possible - in case of a technical issue with the software - we are happy to respond to email and telephone queries, we will endeavour to respond as soon as we can but we cannot guarantee response time. Software is supplied subject to our terms and conditions and software licence terms. We reserve the rights to refuse support. Software is licensed for installation on a single computer. ***
Related Articles
Andica MTD VAT Excel Mapping Requirement
Andica MTD VAT Excel Spreadsheet Bridging Software Customers can link their Microsoft Excel Spreadsheet containing VAT transaction with Andica MTD VAT Software and extract VAT 9-Box values using the spreadsheet mapping screen and drag and drop VAT100 ...MTD VAT Return Changes after Brexit (Version 2021)
Andica MTD VAT Return Changes VAT Return before Brexit Box 2: VAT due in this period on acquisitions from other EC Member States. Box 4: VAT reclaimed in the period on purchases and other inputs (including acquisitions from the EU). Box 8: Total ...Basic iXBRL Accounts Template Tagging FRS 102
As described in Andica CT600 software Features, the software provides a free accounts template to record details of accounts in a pre-defined set of fields. A single Accounts and Computation template is included within the software in line with some ...HMRC MTD VAT Digital Re-Authorisation
An MTD VAT Registered Business or an Agent must give Andica MTD VAT software permission to interact with their data on HMRC MTD system. This is a standard practice required by HMRC. You will need to authorise the software before you can send VAT ...Enabling Trading and Professional income section - Boxes 3.1 to 3.117
Enabling Trading and Professional income section - Boxes 3.1 to 3.117 I cannot see any trading and professional income within the Partnership Statement, boxes are greyed out and I cannot enter any values. It is likely that you are accessing the ...
